5. Feb 2020 |

SSH keys in Ubuntu (basic commands)

Update and clean.

#! /usr/bin/bash

sudo apt-get update && sudo apt-get -y dist-upgrade && sudo apt-get -y autoremove --purge && sudo apt-get -y clean

Regular ones

ctrl+A – beginning
ctrl+E – end
alt+F – move cursor forwadr
alt+B – move cursor back
ctrl+G – exit ssh session or exit recursive search
ctrl+L – clear terminal
ctrl+U – clear line, if curson in the end
ctrl+K – clear line, if curson in the beginning
ctrl+D – logout

mv * .. – move everything one folder up

SSH keys

Located in: /home/robert/.ssh/id_rsa.pub
To generate keys: ssh-keygen
To display in terminal: cat ~/.ssh/id_rsa.pub
Give bash script permissions: chmod +x script.sh

Add additional keys to this file:
cat ~/.ssh/authorized_keys

New password for current user: sudo passwd root

Useful guide: https://www.digitalocean.com/community/tutorials/how-to-set-up-ssh-keys-on-ubuntu-1604

WSL (Windows subsystem for Linux)

explorer.exe . – opens current directory in Explorer.

sudo tcpflow -p -C -i lo port 8080 – listen to port 8080 and see the traffic

29. Jan 2020 |

WordPressi backupi tegemine (bash script)

Varukoopia tegemine enda WordPressi lehest ei ole nii keeruline kui võib tunduda.

Seoses kasvava vajadusega varukoopiate järgi tegin endale selgeks, kuidas bash scripti kasutada. Mul olid varasemalt vajalikud read olemas ja sain neid terminalis kasutada aga selline rea kaupa toimetamine muutus tüütuks. Google otsing andis sellised vastused:

Aga noh, natuke liiga keerulised minu arust. NB! Kui SSH ühenduse loomine on sulle võõras, siis Zone helpis on hea juhend. Aga, sul tegelikult ei ole SSHd varukoopia tegemiseks vaja. Piisab ka komplektist: notepad + FTP + cron töö (iseteeninduses). Samas, katsetamiseks ja hiljem nt lahtipakkimiseks on siiski SSH mugavam.

📌 NB! See varukoopia tegemise juhend töötab standardse WP installi puhul. Muudel juhtudel (nagu näiteks see) ma ei ole seda katsetanud.

Scripti sisu

Echo asjad panin tooltipideks, et terminalis vaikus ei oleks terve aja 🙂 Kui andmebaas on suur, siis selle export ja pakkimine võtab omajagu aega. Eeldus on, et scripti fail on ühe kausta jagu madalamal kui WP install. Antud näites on WP install kaustas /htdocs.

#!/bin/bash
echo "Backupi tegemine algas!"
cd htdocs
echo "Andmebaasi export algas..."
wp-cli db export
echo ""
echo "Andmebaasi export tehtud!"
cd ..
echo "Alustasin pakkimist..."
tar czf "$(date +"%Y%m%d")_veebileht.tar.gz" htdocs/
echo "Pakkimine tehtud!"
rm htdocs/*.sql
echo "Andmebaas kustutatud!"
echo "Backupi tegemine lõpetatud."

Selle ülal oleva sisu salvestad näiteks backup.sh failina, käivitad eelpool toodud käsureaga ja ongi kõik. Mida mingi rida teeb?

3. rida – liigub kausta, kus on WP install.
5. rida – teeb andmebaasist koopia ja paneb selle WP installi kausta. Zones piisab wp db export, Veebimajutuses on vaja wp-cli db export.
6. rida – prindib tühja rea terminali 🙂 ilu pärast.
8. rida – liigub ühe kausta jagu madalamale
10. rida – teeb tar.gz formaadis koopia WP installi kaustast, kus sees on ka andmebaasi koopia. Faili nimi kujul YYYYMMDD_failinimi.tar.gz. Kui peaksid selle varukoopia tegemise näiteks cron tööga automatiseerima, siis iga päev on erinev faili nimi. Stackoverflowst leiab mingi juhendi, kuidas kellaaeg ka sisse panna soovi korral.
12. rida – kustutab andmebaasi koopia (kõik *.sql failid WP installi kaustast), sest noh, ei jäta selliseid asju vedelema.

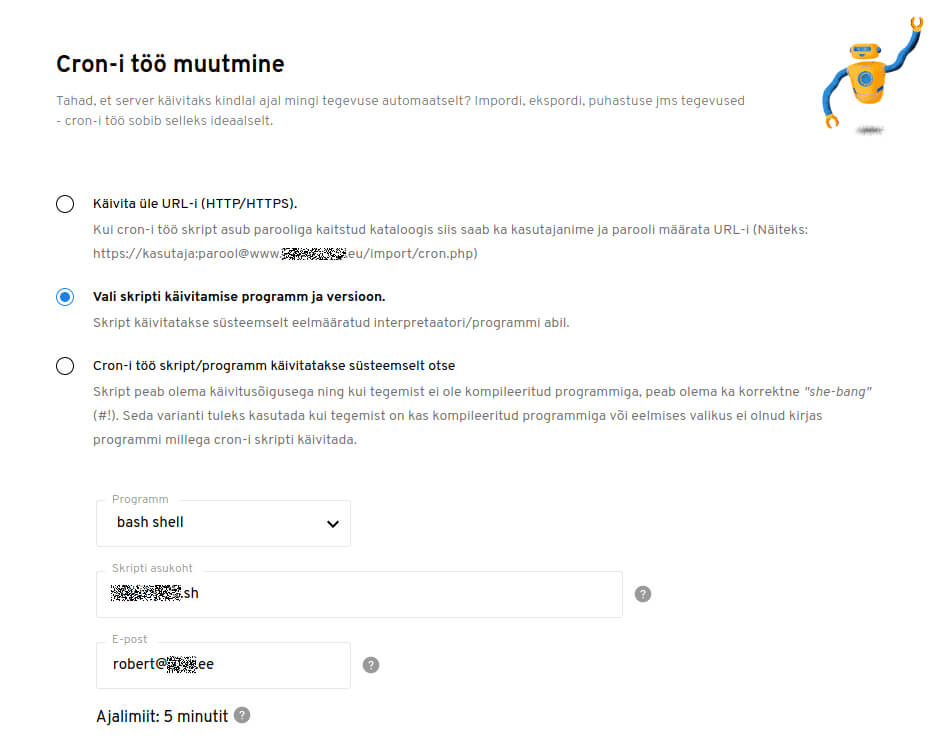
NB! Zones ei sellist lihtsat varianti .sh käivitamiseks nagu pildil näidatud. Seal on vaja faili 2. reale lisada ${0%/*} või 3. reale panna täielik teekond alates /tmp kaustast, kus script tegelikult käivitatakse. Lisaks on käsk iseteeninduses selline:

/bin/bash [[$D2ND_A]]/script.sh

ja scripti failile on vaja teha terminalis: chmod +x script.sh (sest script peab olema executable)

Veelkord: See path, mis Zone iseteeninduses määrad on täispikk kataloog, kus script asub. Sinna ei tehta vaikimisi “cd”, see on lihtsalt muutuja, mida kasutada, et näiteks kui partitsioon peaks muutuma, siis muutujas läheb partitsioon ise õigeks. Cron käivitatakse ~/tmp kataloogis. Käsurealt võib proovida ise cd ~/tmp ja seal sees /data/…/script.sh käivitada. See on siis sama olukord, nagu crontab seda käivitaks.

Kuidas .sh faili teha?

Notepadiga teed faili (kui muud tööriista ei ole harjunud kasutama) ja hiljem muuda lihtsalt faili laiend ära 🙂

Scripti käivitamine

Käsk scripti käivitamiseks (koos sisselogimisega) on Zones selline:

ssh virt5713@neti.ee "bash domeenid/www.neti.ee/neti.sh"

Veebimajutuses selline:

ssh -p 1022 vhost57175ssh@pood.eu "bash pood.sh"

.sh faili path sõltub sellest, kuhu sa parasjagu sisse logimisega satud. Zone.ee ja Veebimajutuse käsud on pisut erinevad (aga mõlemal on iseteeninduses juhendid olemas. See teeb korraga sisselogimise ja scripti käivituse. Kui oled juba sisse loginud ja .sh failiga samas kaustas, siis piisab lihtsalt:
bash failinimi.sh

Regulaarse varukoopia tegemiseks (nt üle päeva) on hea mõte kasutada regulaartöid ehk cron töid, mida on lihtne seadistada iseteenindusest. See tähendab, et script pannakse tööle sinu poolt määratud ajal. Veebimajutuses näeb see välja näiteks nii.

Kuidas lahti pakkida

Lahti pakkimise osa on mul siin olemas käsuridade kaupa. Win10 arvutis mul seda lihtsalt 7zipiga näiteks lahti pakkida ei õnnestunud aga serveris tuleb kenasti näiteks sellise käsureaga:

tar -xzvf archive.tar.gz dir/

Kuidas kokku pakkida (excludega)

tar -zcvf "$(date +"%Y%m%d")_occo.tar.gz" --exclude=node_modules occo/

NB! Suurte failihulkade lahtipakkimisel ole ettevaatlik. Ma ükskord pakkisin Magento (~60 tuhat faili) serveri root folderisse lahti muude asjade sekka. Tükk aega oli koristamist 😀

9. Nov 2019 |

Bulk delete WooCommerce products by category using WP-CLI

If you would like to know how to bulk delete posts from a specific category using the WP-CLI then here it is.

WP-CLI is command line interface for maintenance of WordPress. This is something I try to figure out.

Deleting one product

This deletes 1 product. 1157 is product ID. Without –force it does not work, because posts of type ‘product’ do not support being sent to trash.
So you need to use –force flag to skip trash and delete them permanently.

wp post delete 1157 --force

Deleting 100 products

Now I try to figure out how can I delete all products within category. This allows to delete 100 products at a time.

wp post delete $(wp wc product list --user=1 --format=ids --category=64) --force

Deleting specific number of products

wp post delete $(wp wc product list --user=1 --format=ids --category=64 --per_page=10) --force

By specifying –per_page you can limit how many products will be deleted with one execution. But it only works between 1 and 100 products.

Reason is that WooCommerce commands are implement as REST API requests and they are limited to a maximum of 100 results per request. This is a limitation that comes from WooCommerce, not WP-CLI. It’s unfortunate they have limited it that way, as it seriously lessens the benefits of having CLI commands in the first place.

Final solution that works (tested with 5000+ products)

for run in {1..2}; do wp post delete $(wp wc product list --user=1 --format=ids --category=64 --per_page=10) --force; done

This line does the job. Loops I found here and here. This sample deletes 20 products by using two runs, 10 products each. And this deletes products with status as “draft” (reference):

for run in {1..2}; do wp post delete $(wp wc product list --user=1 --format=ids --status=draft --per_page=10) --force; done

Delete products by product tag

Another one is here. tag is product tag ID.

wp post delete $(wp wc product list --user=1 --format=ids --tag=82 --per_page=2) --force

Deleting revisions

It is not uncommon sites to have multiple revisions on their pages. This is simply due editing and updating content. Let’s say for example a site has 700 pages or posts with 150 revisions on each, this would be over 100,000 entries in the database. To delete unnecessary revisions you can use the following command line:

wp post delete $(wp post list --post_type='revision' --format=ids) --force

I have posted the question also to WordPress.org forum here for discussion and #cli channel. Hopefully someone comes up with the answer 🙂 Also sent it to Eric. Maybe he knows.

Bonus:
WP-allimport faster finder: [wc_get_product_id_by_sku({sku[1]})]
Delete all images in media library: wp post delete --force $(wp post list --post_type='attachment' --format=ids)

5. Sep 2019 |

Command lines for WordPress backups

Instead of Duplicator you can always use shell.

Pets shared these instructions in Zone slack. I tested and these work differently in Zone and Veebimajutus.

Everything after # (included) is not part of command line but is comment!

In Zone

4 steps to create backup:

wpfolder is the directory where you have your WP installation. For example htdocs

cd wpfolder # move to folder where your WP installation is.
wp db export # create WP database dump.
cd .. # move one folder upwards.
tar czf veeb_2019-09-05.tar.gz wpfolder/ # pack the folder where you now have database dump and wp installation.

It is very important not to keep your database dump and backup publicly available. Please store these offline if possible.

5 steps to import backup

tar xzf veeb_2019-09-05.tar.gz # unpack your backup
cd wpfolder # move to folder where you have your wp files
nano wp-config.php # change db user, pass and host
wp db import databasefilename.sql # imports copy of database to dp defined in wp-config.
wp search-replace "https://oldname" "https://newname" # replace old URLs everywhere with new.

After import you need to log in to your wp-admin and update permalinks (even if you don’t plan to change anything). I suggest you try it before to understand how everything works.

For Veebimajutus you need to know this secret

It used to be sot that instead of wp you had to type wp-cli in command lines if you use Veebimajutus. But not anymore.

Instead of “localhost” in wp-config you need to have IP 127.0.0.1 because 🙂 You can not find this information anywhere.

Moving large files between servers

Instead of dowloading and uploading (in case you need to move huge amounts of files) you can use wget. I basically means you log in to your new server and move to the folder where you would like to have the file. An you type:

wget https://google.com/myhugefile.zip

This way you can transfer gigabytes of files within seconds between servers.

5. Aug 2019 |

Best free SSH client for Windows

Really, don’t look any further.

You have two options. Windows’ own powershell or Ubuntu. That is it.

Ubuntu looks nicer out of the box. But powershell also does the job. Compared to my previous experience with PuTTY (a free SSH and telnet client on Windows 7) – everything is smoother than PuTTY.

3. Aug 2019 |

How to open terminal in Windows 10

Win+R → write “powershell” without quotation marks → and terminal opens.

Very good instructions are here for Zone.ee server users on how to get to your shared hosting through SSH. For beginners this is super useful.

Ubuntu terminal on Windows 10

It is also possible to use Ubuntu terminal on Windows 10. You can download it from Microsoft Store, for example here. But, before you can install it you have to set your Windows settings to developer mode.

If you do not do this then simply does not work. Maybe there was something in addition to that but at this point I do not remember 🙂 But it took few hours to figure out why does the Microsoft Store installation fails.